CHAPTER
|
Textual tools |
|
Every text-handling system needs to support a repertoire of tools for doing things with text. LATEX implements many dozens, of which a small selection of the most frequently used is given here:
-
offset quotations (sometimes called ‘block quotes’);
-
footnotes and end-notes;
-
marginal notes;
-
cross-references, both normal ones and bibliographic citations;
-
indexes and glossaries;
-
typesetting in multiple columns.
 7.1 Quotations
Direct speech and short quotes within a sentence ‘like this’ are done with simple quotation marks as described in section 2.6. Sometimes, however, you may want longer quotations set as a separate paragraph. Typically these are indented from the surrounding text. LATEX has two environments for doing this.
Such quotations are often set in a smaller size of type,
although this is not the default, hence the use of the
\small command in the second example. The
inclusion of the bibliographic citation at the end is
optional: here it is done with a non-standard command
\citequote which I invented for this example
(there is more about how to do things like this in Chapter 9).
- The quote environment
is for up to a line of text each per (short) quotation, with the whole thing indented from the previous paragraph but with no additional indentation on each quote;
\begin{quote}
Do, Ronny, Do. \textit{Nancy Reagan}

Da Do Ron Ron. \textit{The Crystals}
\end{quote}
Do, Ronny, Do. Nancy Reagan
Da Do Ron Ron. The Crystals
- The quotation environment
is for longer passages (a paragraph or more) of a single quotation, where not only is the block of text indented, but each paragraph of it also has its own extra indentation on the first line.
\begin{quotation}\small
At the turn of the century William Davy,
a Devonshire parson, finding errors in
the first edition of his \titleof{davy},
asked for a new edition to be printed.
His publisher refused and Davy purchased
a press, type, and paper. He harnessed
his gardener to the press and apprenticed
his housemaid to the typesetting. After
twelve years' work, a new edition
of fourteen sets of twenty-six volumes
was issued---which surely indicates that,
when typomania is coupled with religious
fervour, anything up to a miracle may be
achieved.\citequote[p.76]{ryder}
\end{quotation}
At the turn of the century William Davy, a Devonshire parson, finding errors in the first edition of his A System of Divinity, asked for a new edition to be printed. His publisher refused and Davy purchased a press, type, and paper. He harnessed his gardener to the press and apprenticed his housemaid to the typesetting. After twelve years' work, a new edition of fourteen sets of twenty-six volumes was issued---which surely indicates that, when typomania is coupled with religious fervour, anything up to a miracle may be achieved.
John Ryder (1976), Printing for Pleasure, p.76
7.2 Footnotes and end-notes
The command \footnote, followed by the
text of the footnote in curly braces, will produce an
auto-numbered footnote with a raised small number where you
put the command, and the numbered text automatically printed
at the foot of the page.1 The number is reset to 1 at the start of each
chapter (but you can override that and make them run
continuously throughout the document, or even restart at 1 on
each page or section).
LATEX automatically creates room for the footnote, and automatically reformats it if you change your document in such a way that the point of attachment and the footnote would move to the next (or preceding) page.
Because of the way LATEX reads the whole footnote before
doing anything with it, you can't use
\verb (section 6.6.1) alone
in footnotes: either precede it with
\protect or use [abuse?] the
\url command instead, which you should be
using for Web and email addresses in any case).
Footnotes inside minipages (see section 6.7) produce lettered notes instead of numbered ones, and they get printed at the bottom of the minipage, not the bottom of the physical page (but this too can be changed).
There is a package to hold over your footnotes and make them print at the end of the chapter instead (endnote) or at the end of the whole document, and there is a package to print many short footnotes in a single footnoted paragraph so they take up less space (fnpara). It is also possible to have several separate series of footnotes active simultaneously, which is useful in critical editions or commentaries: a numbered series may be used to refer to an original author's notes; a lettered series can be used for notes by a commentator or authority; and a third series is available for your own notes. It is also possible to format footnotes within footnotes.
If your footnotes are few and far between, you may want to
use footnote symbols instead of numbers. You can do this by
redefining the output of the footnote counter to be the
\fnsymbol command:
\renewcommand{\thefootnote{\fnsymbol{footnote}}
There are also ways to refer more than once to the same footnote, and to defer the positioning of the footnote if it occurs in a float like a Table or Figure, where it might otherwise need to move to a different page.
7.3 Marginal notes
| You can add marginal notes to your text↞ instead of (or as well as) footnotes. You need to make sure that you have a wide-enough margin, of course: use the geometry package (see section 5.1.1) to allocate enough space, otherwise the notes will be too cramped. There are several packages to help with formatting marginal notes, but the simplest way is to define it yourself. Add this new command to your preamble: | Like this. |
\newcommand{\marginal}[1]{%
      \leavevmode\marginpar{\tiny\raggedright#1\par}}
Then you can use \marginal{Some
text}↞ Be careful, however, because marginal
notes are aligned with the line where the command starts, so a
very long one followed too closely by another will cause
LATEX to try and
adjust the position so they don't overlap.
|
Some text where you need it. |
We're jumping ahead a bit here, as we haven't covered how to define your own commands yet. I won't even try to explain it here, although the attentive reader can probably deduce some of it by inspection. See Chapter 9 for more information about making up your own commands.
7.4 Cross-references
This is one of the most powerful features of LATEX. You can label any point in a document with a name you make up, and then refer to it by that name from anywhere else in the document, and LATEX will always work out the cross-reference number for you, no matter how much you edit the text or move it around.
A similar method is used to cite documents in a bibliography or list of references, and there are packages to sort and format these in the correct manner for different journals.
7.4.1 Normal cross-references
You label a place in your document by using the command
\label followed by a short name you make
up, in curly braces:2 we've already seen this done for labelling
Figures and Tables.
\section{New Research}
\label{newstuff}
You can then refer to this point from anywhere in the
same document with the command \ref
followed by the name you used, e.g.
In \S~\ref{newstuff} there is a list of recent
projects.
In § 7.4.1 there is a list of recent projects.
(The \S command produces a section
sign (§) and the
\P command produces a paragraph sign
(¶).)
If the label is in normal text, the reference will provide the current chapter or section number or both (depending on the current document class).3 If the label was inside a Table or Figure, the reference provides the Table number or Figure number prefixed by the chapter number. A label in an enumerated list will provide a reference to the item number. If there is no apparent structure to this part of the document, the reference will be null. Labels must be unique (that is, each value must occur only once as a label within a single document), but you can have as many references to them as you like.
Note the use of the unbreakable space
(~) between the \ref
and the word before it. This prints a space but prevents the
line ever breaking at that point, should it fall close to
the end of a line.
The command \pageref followed by any
of your label values will provide the page number where the
label occurred, regardless of the document structure. This
makes it possible to refer to something by page number as
well as its \ref number, which is useful
to readers in very long documents.
Unresolved references are printed as two question
marks, and also cause a warning message at the end of the
log file. There's never any harm in having
\labels you don't refer to, but using
\ref when you don't have a matching
\label is an error.
7.4.2 Bibliographic references
The mechanism used for references to reading lists and bibliographies is almost identical to that used for normal cross-references. Although it is possible to type the details of each citation manually, there is a companion program to LATEX called BIBTEX, which manages bibliographic references automatically. This reduces the time needed to maintain and format them, and dramatically improves accuracy. Using BIBTEX means you only ever have to type the bibliographic details of a work once. You can then cite it in any document you write, and it will get formatted automatically to the style you specify.
7.4.2.1 Citing references
BIBTEX works exactly the same way as other
bibliographic databases: you keep details of every
document you want to refer to in a separate file, using
BIBTEX's own format (see example below). Many
writers make a habit of adding the details of every book
and article they read, so that when they write a document,
these entries are always available for reference. You give
each entry a short label, just like you do with normal
cross-references (see section 7.4.1), and
it is this label you use to refer to in your own documents
when you cite the work using the \cite
command:
...as has clearly been shown by Fothergill~\cite{fg}.
By default, this creates a cross-reference number in square brackets [1] which is a common style in the Natural Sciences (see section 7.4.2.5 for details of how to change this). There are dozens of alternative citation formats in extra packages, including the popular author/year format:
...as has clearly been shown
by~\citeauthoryear{fg}.
...as has clearly been shown by Fothergill (1929).
Note that in this case you don't type the
author's name because it is automatically extracted
by BIBTEX. There are lots of variants on this technique
in many packages, allowing you to phrase your sentences
with references in as natural a way as possible, and rely
on BIBTEX to insert the right data. (If you examine the
source of this document you'll find I use some
homebrew commands like \authorof and
\titleof which I use for a similar
purpose.)
To print the bibliographic listing (usually called ‘References’ in articles and ‘Bibliography’ in books and reports), add these two lines towards the end of your document, or wherever you want it printed, substituting the name of your own BIBTEX file and the name of your chosen bibliography style:
\bibliographystyle{ieeetr}
\bibliography{mybib}
-
The
\bibliographycommand is followed by the filename of your BIBTEX file without the.bibextension. -
The
\bibliographystylecommand is followed by the name of any of LATEX's supported bibliography styles, of which there are many dozens available from CTAN.4
The styles plain and alpha are two common generic styles used for drafts. The example above uses Transactions of the Institute of Electrical and Electronics Engineers (IEEETR).
7.4.2.2 Running bibtex
When you run the bibtex
program, the details of every document you have cited will
be extracted from your database, formatted according to
the style you specify, and stored in a temporary
bibliographic (.bbl) file with a
label corresponding to the one you used in your citation,
ready for LATEX to use. This is entirely automatic: all
you do is cite your references in your LATEX document
using the labels you gave the entries in your BIBTEX
file, and run the bibtex
program.
After processing your file with LATEX, run
BIBTEX on it by clicking on the
BIBTEX toolbar icon (if your editor
has one), or use the
→ menu entry, or type the command
bibtex followed by the name of your
document (without the .tex
extension). When you run LATEX again it will use the
.bbl file which BIBTEX created,
and subsequent runs of LATEX will format the correct
citation numbers (or author/year, or whatever format you
are using).
$ latex mybook
$ bibtex mybook
$ latex mybook
$ latex mybook
Because of this three-stage process, you always get a warning message about an ‘unresolved reference’ the first time you add a new reference to a previously uncited work. This will disappear after subsequent runs of bibtex and LATEX.
In practice, authors tend to run LATEX from time to
time during writing anyway, so they can preview the
document. Just run BIBTEX after adding a new
\cite command, and subsequent runs of
LATEX will incrementally incorporate all references
without you having to worry about it. You only need to
follow the full formal sequence (LATEX, BIBTEX,
LATEX, LATEX) when you have finished writing and
want to ensure that all references have been
resolved.
7.4.2.3 BIBTEX format
The format for the BIBTEX file is specified in the
BIBTEX documentation (see section 5.1.2
for how to find and print it). You create a file with a
name ending in .bib, and add your
entries, for example:
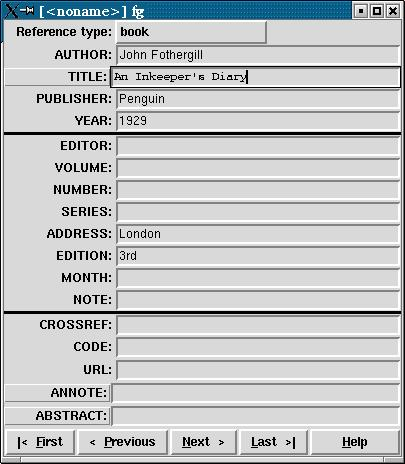
@book{fg,
   title        = {{An Innkeeper's Diary}},
   author       = {John Fothergill},
   edition      = {3rd},
   publisher    = {Penguin},
   year         = 1929,
   address      = {London}
}
There is a prescribed set of fields for each of a
dozen or so types of document: book, article (in a
journal), article (in a collection), chapter (in a book),
thesis, report, paper (in a Proceedings), etc. Each entry
identifies the document type after the
‘@’ sign,
followed by the entry label that you make up, and then
each field (in any order), using the format:
keyword = {value},
Most TEX-sensitive editors have a BIBTEX mode
which understands these entries.
Emacs automatically uses its
bibtex-mode whenever you open a
filename ending in .bib. When editing
BIBTEX databases, the rules are simple:
-
Omit the comma after the last field in the entry (only — eg after
{London}in the example). -
Titles may have their case changed in some styles: to prevent this, enclose the title in double curly braces as in the example.
-
Values which are purely numeric (e.g. years) may omit the curly braces.
-
Fields can occur in any order but the format must otherwise be strictly observed.
-
Fields which are not used do not have to be included (so if your editor automatically inserts them as blank or prefixed by
OPT[optional], you can safely delete them as unused lines).
To help with this, there are several interfaces to creating and maintaining BIBTEX files, such as tkbibtex (see Figure 7.1), or pybliographic.
7.4.2.4 Changing the layout
To change the title printed over the reference
listing, just change the value of
\refname (articles) or
\bibname (books and reports) by adding a
line like this in your preamble:
\renewcommand{\bibname}{Reading List}
The formatting specifications (BIBTEX styles) are
based on standard settings for journals and books from
dozens of publishers: you just pick the one you want by
name. The texmf/bib/bst subdirectory
of your installation contains the ones installed by
default, and you can search on CTAN
for others (look for .bst files).
Many of them are named after university press styles
(e.g. harvard,
oxford) or the publisher or
journal which specified them (e.g.
elsevier,
kluwer, etc.).
Some of them have an accompanying package
(.sty) file which
you need to include with the normal
\usepackage command in your preamble. In
this case the format may be distributed as
.dtx and .ins
files and will need installing in the same way as any
other package (see section 5.2). Always read
the documentation, because most of the formats are very
specific to the journal they were designed for, and may have
fairly absolute requirements.
If you are writing for a specific publisher, you should remember that the rules or formats are laid down by the typographic designer of that journal or publisher: you cannot arbitrarily change the format just because you don't happen to like it: it's not your choice!
It is also possible to write your own BIBTEX
(.bst) style files, although it uses
a language of its own which really needs a computer
science background to understand. However, this is
rendered unnecessary in most cases: there is an extensive
program (actually written in LATEX) called
makebst, which makes
.bst files by asking you a (long)
series of questions about exactly how you want your
citations formatted. Just type
latex makebst in a command window, but
give it a dummy run first, because some of the questions
are very detailed, so you need to have thought through how
you want your citations to appear before you start.
7.4.2.5 Other modes of citation
The method of citing a work by numeric reference is common in the Natural Sciences but is not used in Law or the Humanities. In these fields, citations are usually done with short references (author/short-title/year) in a numbered footnote. Sometimes they are actually called ‘footnotes’ to the exclusion of ordinary footnotes, although they are really citations which happen by convention to be displayed as footnotes: an important distinction rarely appreciated by authors until they come to need a normal footnote.
For these fields, the bibliography at the back of the document is printed unnumbered in alphabetic order of author, or perhaps chronologically if the time-frame is very large. This unnumbered format is why it is conventionally called ‘References’ rather than ‘Bibliography’: a sufficient working citation has already been provided in the footnote, and the list at the back is for reference purposes only; whereas in the Natural Sciences, the citation is just a number, or possibly an author and year only, so the full listing is called a Bibliography.
The jurabib package (originally intended for German law articles but now extended to other fields in the Humanities, and to other languages) has extensive features for doing this style of citation and is strongly recommended.
7.5 Indexes and glossaries
LATEX has a powerful, automated indexing facility which
uses the standard makeindex
program. To use indexing, use the package
makeidx and include the
\makeindex command in your preamble:
\usepackage{makeidx}
\makeindex
When you want to index something, using the command
\index followed by the entry in curly
braces, as you want it to appear in the index, using one of
the following formats:
- Plain entry
Typing
\index{beer}will create an entry for ‘beer’ with the current page number.- Subindex entry
For an entry with a subentry use an exclamation mark to separate them:
\index{beer!lite}. Subsubentries like\index{beer!lite!American}work to another level deep.- Cross-references
‘See’ entries are done with the vertical bar (one of the rare times it does not get interpreted as a math character):
\index{Microbrew|see{beer}}- Font changes
To change the style of an entry, use the @-sign followed by a font change command:
\index{beer!Rogue!Chocolate
       Stout@\textit{Chocolate Stout}}
This example indexes ‘Chocolate Stout’ and italicises it at the same time. Any of the standard
\text...font-change commands work here: see the table in section 8.2.3 for details.You can also change the font of the index number on its own, as for first-usage references, by using the vertical bar in a similar way to the ‘see’ entries above, but substituting a font-change command name (without a backslash) such as
textbffor bold-face text (see the index):\index{beer!Rogue!Chocolate Stout|textbf}- Out of sequence
The same method can be used as for font changes, but using the alternate index word instead of the font command name, so
\index{Oregon Brewing Company@Rogue}will add an entry for ‘Rogue’ in the ‘O’ section of the index, as if it was spelled ‘Oregon Brewing Company’.
When the document has been processed through LATEX it
will have created a .idx file, which you
run through the makeindex program
by typing (for example):
makeindex mythesis
Some editors may have a button or menu entry for this. The
program will look for the .idx file and
output a .ind file. This gets used by the
command \printindex which you put at the end
of your document, where you want the index printed. The
default index format is two columns.
Glossaries are done in a similar manner using the command
\makeglossary in the preamble and the
command \glossary in the same way as
\index. There are some subtle differences in
the way glossaries are handled: both the books by Lamport (1994) and by Mittelbach et al (2004) duck the issue, but
there is some documentation on glotex on
CTAN.
7.6 Multiple columns
Use the multicol package: the environment is called multicols (note the plural form) and it takes the number of columns as a separate argument in curly braces:
\usepackage{multicol}
...
\begin{multicols}{3}
...
\end{multicols}
LATEX has built-in support for two-column typesetting
via the twocolumn option in the standard
Document Class Declarations, but it is relatively inflexible
in that you cannot change from full-width to double-column
and back again on the same page, and the final page does not
balance the column heights. However, it does feature special
figure* and table*
environments which typeset full-width figures and tables
across a double-column setting.
The more extensive solution is the
multicol package, which will set up
to 10 columns, and allows the number of columns to be
changed or reset to one in mid-page, so that full-width
graphics can still be used. It also balances the height of
the final page so that all columns are the same
height — if possible: it's not always
achievable — and you can control the width of the gutter
by setting the \columnsep length to a new
dimension.
Multi-column work needs some skill in typographic layout, though: the narrowness of the columns makes typesetting less likely to fit smoothly because it's hard to hyphenate and justify well when there is little space to manœuvre in.


